
Stage 1 - get a solid understanding of the basics
Even if you already know the very basics of piano, I would urge you to not skip this step. There might be details here that will make learning the later stages a lot easier.
This is what we will cover in stage 1
- Learn the musical alphabet
- Get comfortable playing in the middle C position
- Reading sheet music
- Learn about sharps and flats
- Understand the difference between half steps and whole steps (you need to be able to speak some of the music language. Especially if you’re looking up other videos)
- Learn a few basic chords along with some chord theory
Once you have learnt this you will be able to do the following:
- Play simple instrumental versions of a vast range of pop songs.
- Accompany yourself on the piano while singing pop songs
- Figure out how to play the melody of tunes that you hear (This is usually called playing from ear)
- Play simple classical pieces
In stage 1 you are mostly going to learn from Dylan Laine’s beginner piano course on YouTube. She has created a great course that follows the same natural progression that I would recommend and explains them really well.
You can go straight to her whole course here if you want to.
But I have also included all the videos you need to watch below along with some explanations. It might be better to follow my links as opposed to going through every single video directly from her YouTube channel. This is because there are some videos I have omitted, sometimes because I’ve already covered the subject in this guide.
The links I have provided also cut out the beginning of each video where she just talks about her YouTube channel. But please like and subscribe to her channel anyway since she has done a terrific job with this video series.
Another benefit of following the list I have made here is that I have included sheet music where you can practise the concepts you have just learnt in a fun, practical way. I have made the layout of the sheet music easy to view straight from your laptop or phone so that you don’t have to print anything. But feel free to print anyway if you prefer that. If you’re learning from your phone, flip it over to landscape mode when you’re using the sheet music, as the images will be a bit larger then.
Learn the musical alphabet
In this section, you will learn how to name all the white keys. This is a crucial point, but very easy.
Here is a video that explains the musical alphabet:
Watch this next. It builds on the musical alphabet:
This is what you need to take away from the video above:
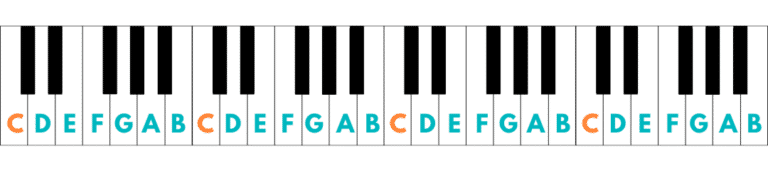
First find the middle C note. The next white key to the right is called D. The next one after that is E, then F. Do you see the pattern? We are following the alphabet that you learnt in primary school. The last letter of the musical alphabet is G. After G it goes back to A. And then it starts all over again. That means that the next white key after G is A. There are only 7 different white keys that just repeat forever and forever.
Playing in the middle C position
Before you learn anything further, it’s important that you get some practise using the white keys. There are so many nice melodies that you can play using the white keys.
For now, let’s just use the right hand. When playing these, place your first finger (thumb) on middle C. Let the other fingers naturally fall on the next keys that naturally happen to be under them, like in this picture:
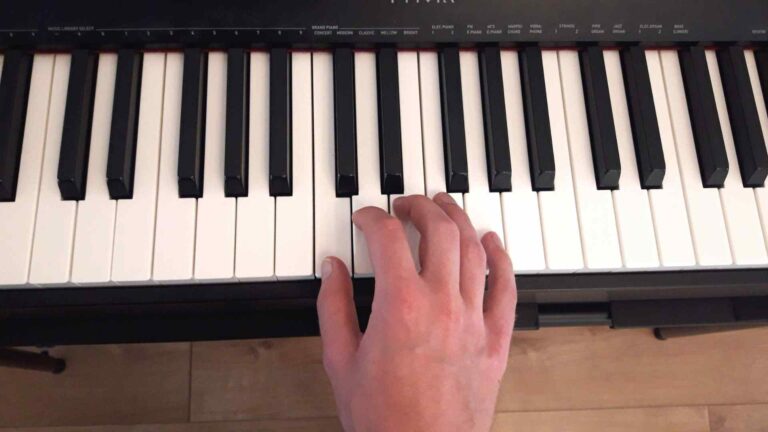
Below is a video that shows you the Middle C position. For the rest of stage 1 of this guide you will only need the right hand.
Now let’s play a few well known melodies using those 5 notes with your right hand.
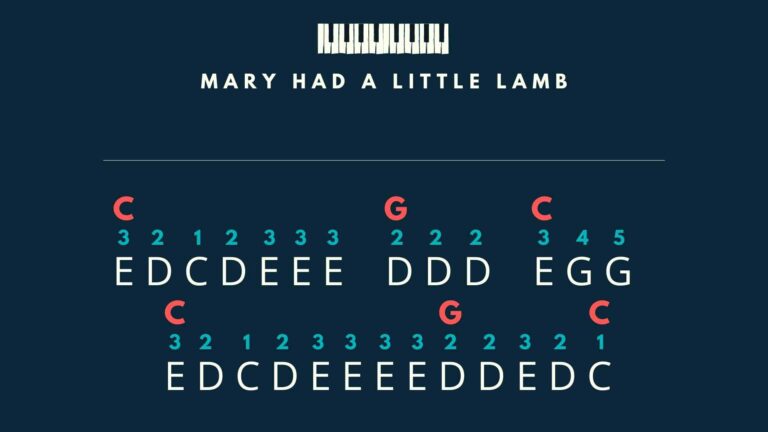
Below you will see the note names of the keys in the Middle C position. The numbers above these note names are finger numbers. Press down the keys in the order I have written them (from left to right) and see if you can hear what the melodies are. When you try these, you might hear that some notes have to be played faster, and some slower. Dashes indicate that there is a slight pause in the music, or a longer note. Make sure you try out the melodies before revealing the the titles!
When playing these, do your best to sit in the correct posture and have curled fingers. If you make this a habit now, you decrease the risk of struggling with this later.
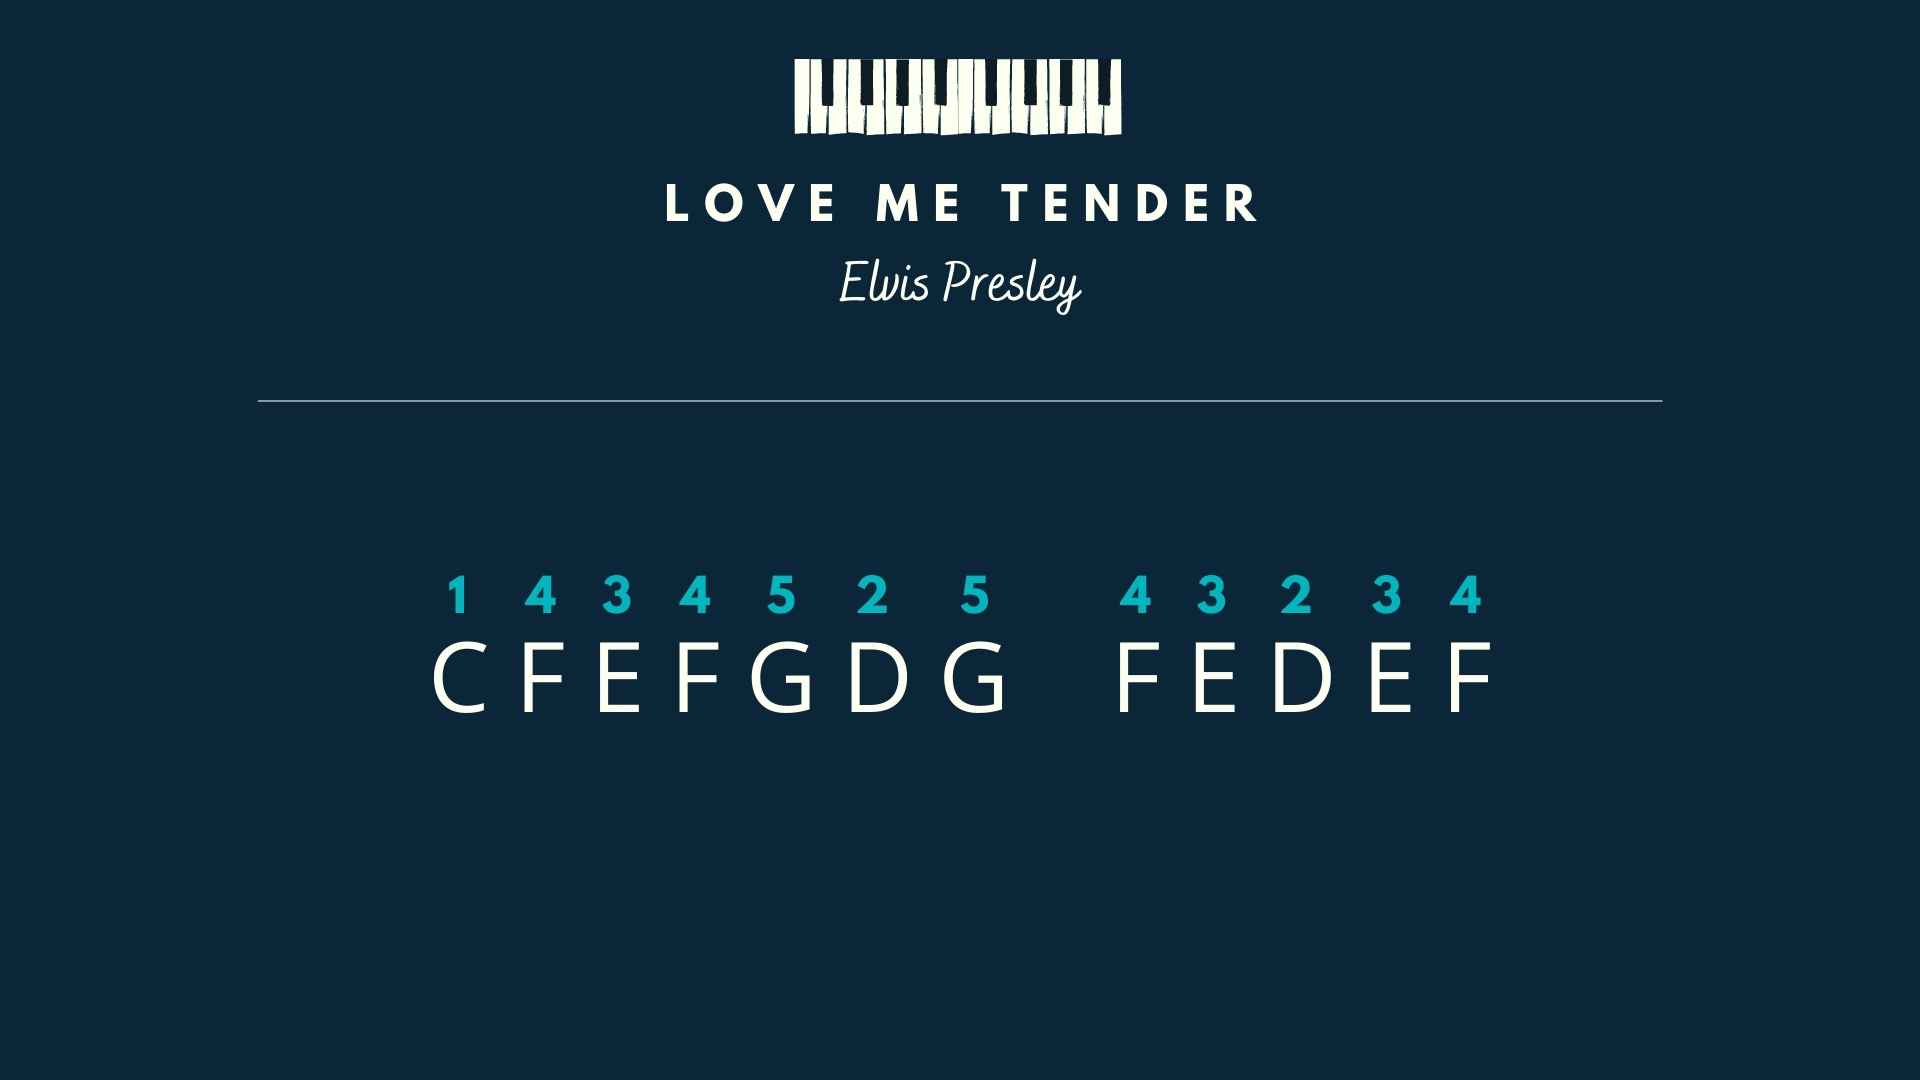
1 4 3 4 5 2 5 4 3 2 3 4
C F E F G D G – F E D E F
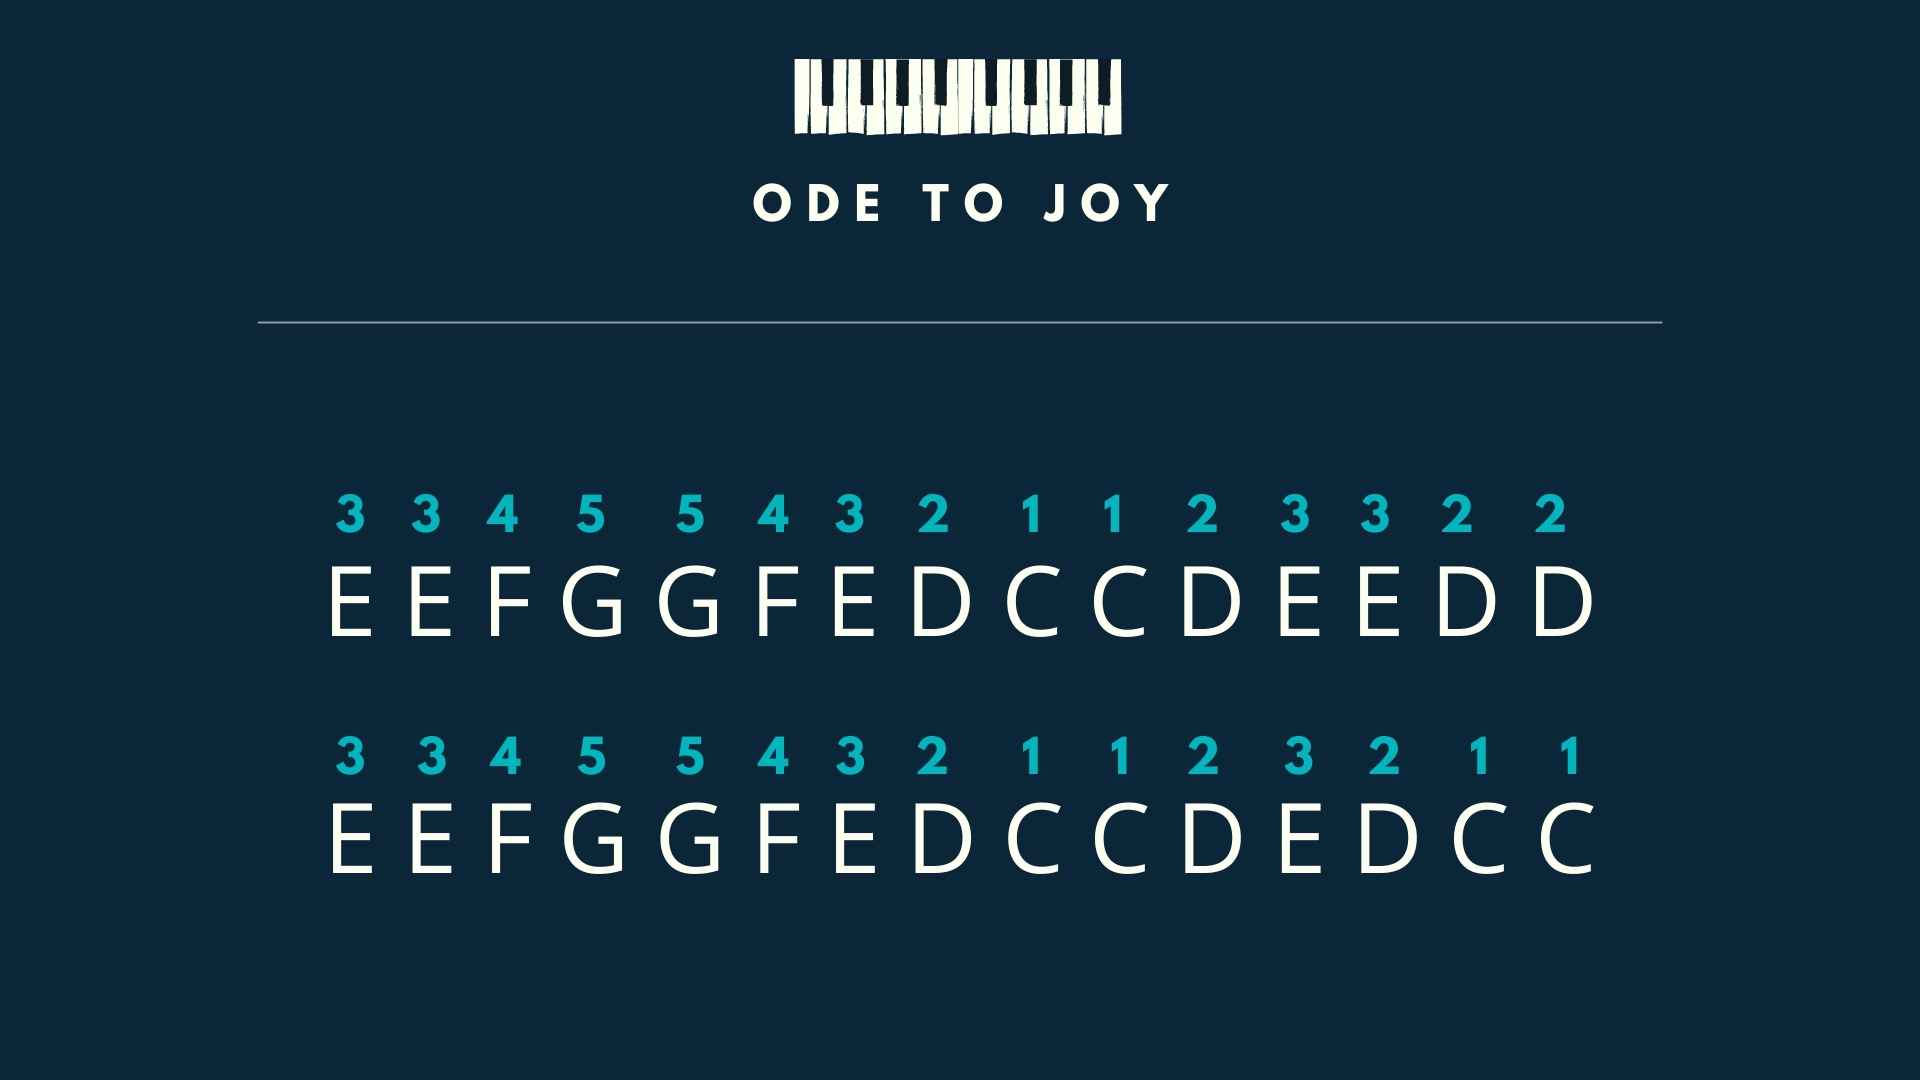
3 3 4 5 5 4 3 2 1 1 2 3 3 2 2 3 3 4 5 5 4 3 2 1 1 2 3 2 1 1
E E F G G F E D C C D E E D D – E E F G G F E D C C D E D C C
3 2 1 2 3 3 3 2 2 2 3 5 5 3 2 1 2 3 3 3 3 2 2 3 2 1
E D C D E E E – D D D – E G G – E D C D E E E E D D E D C
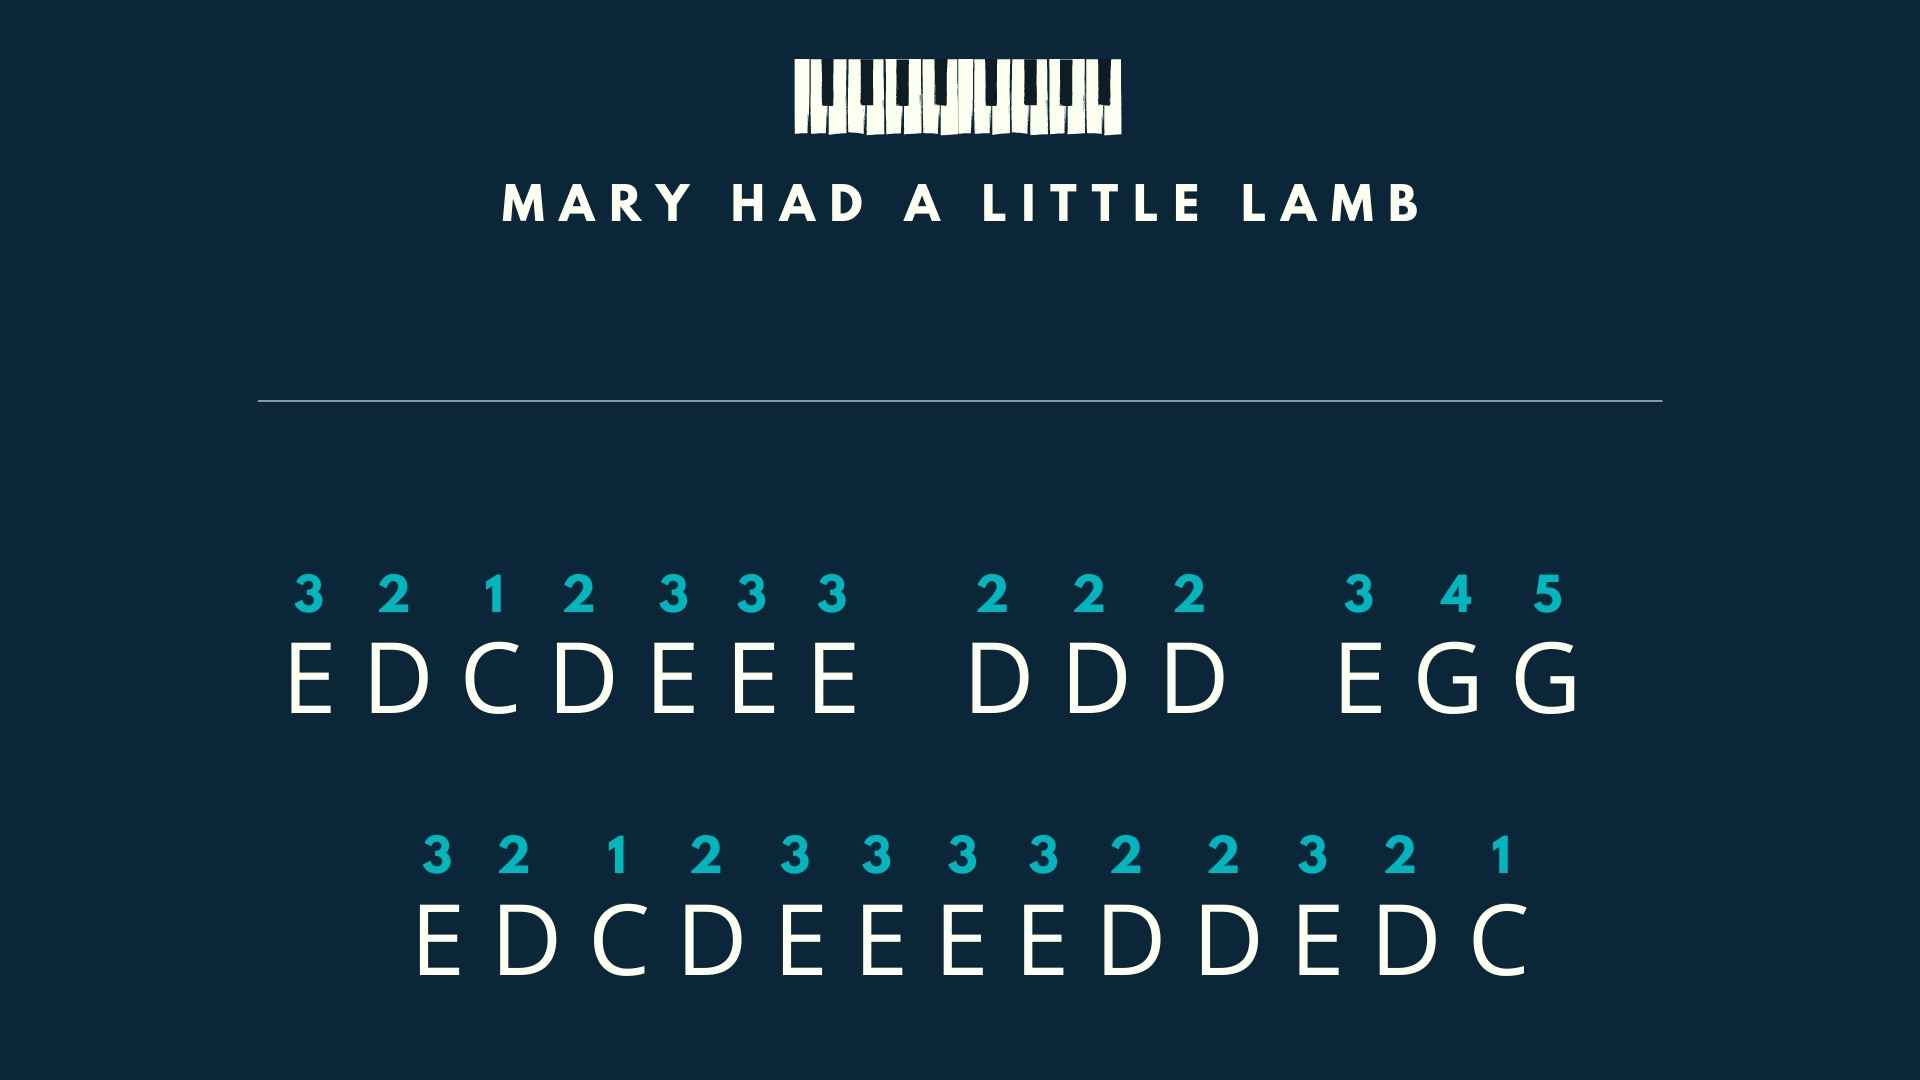
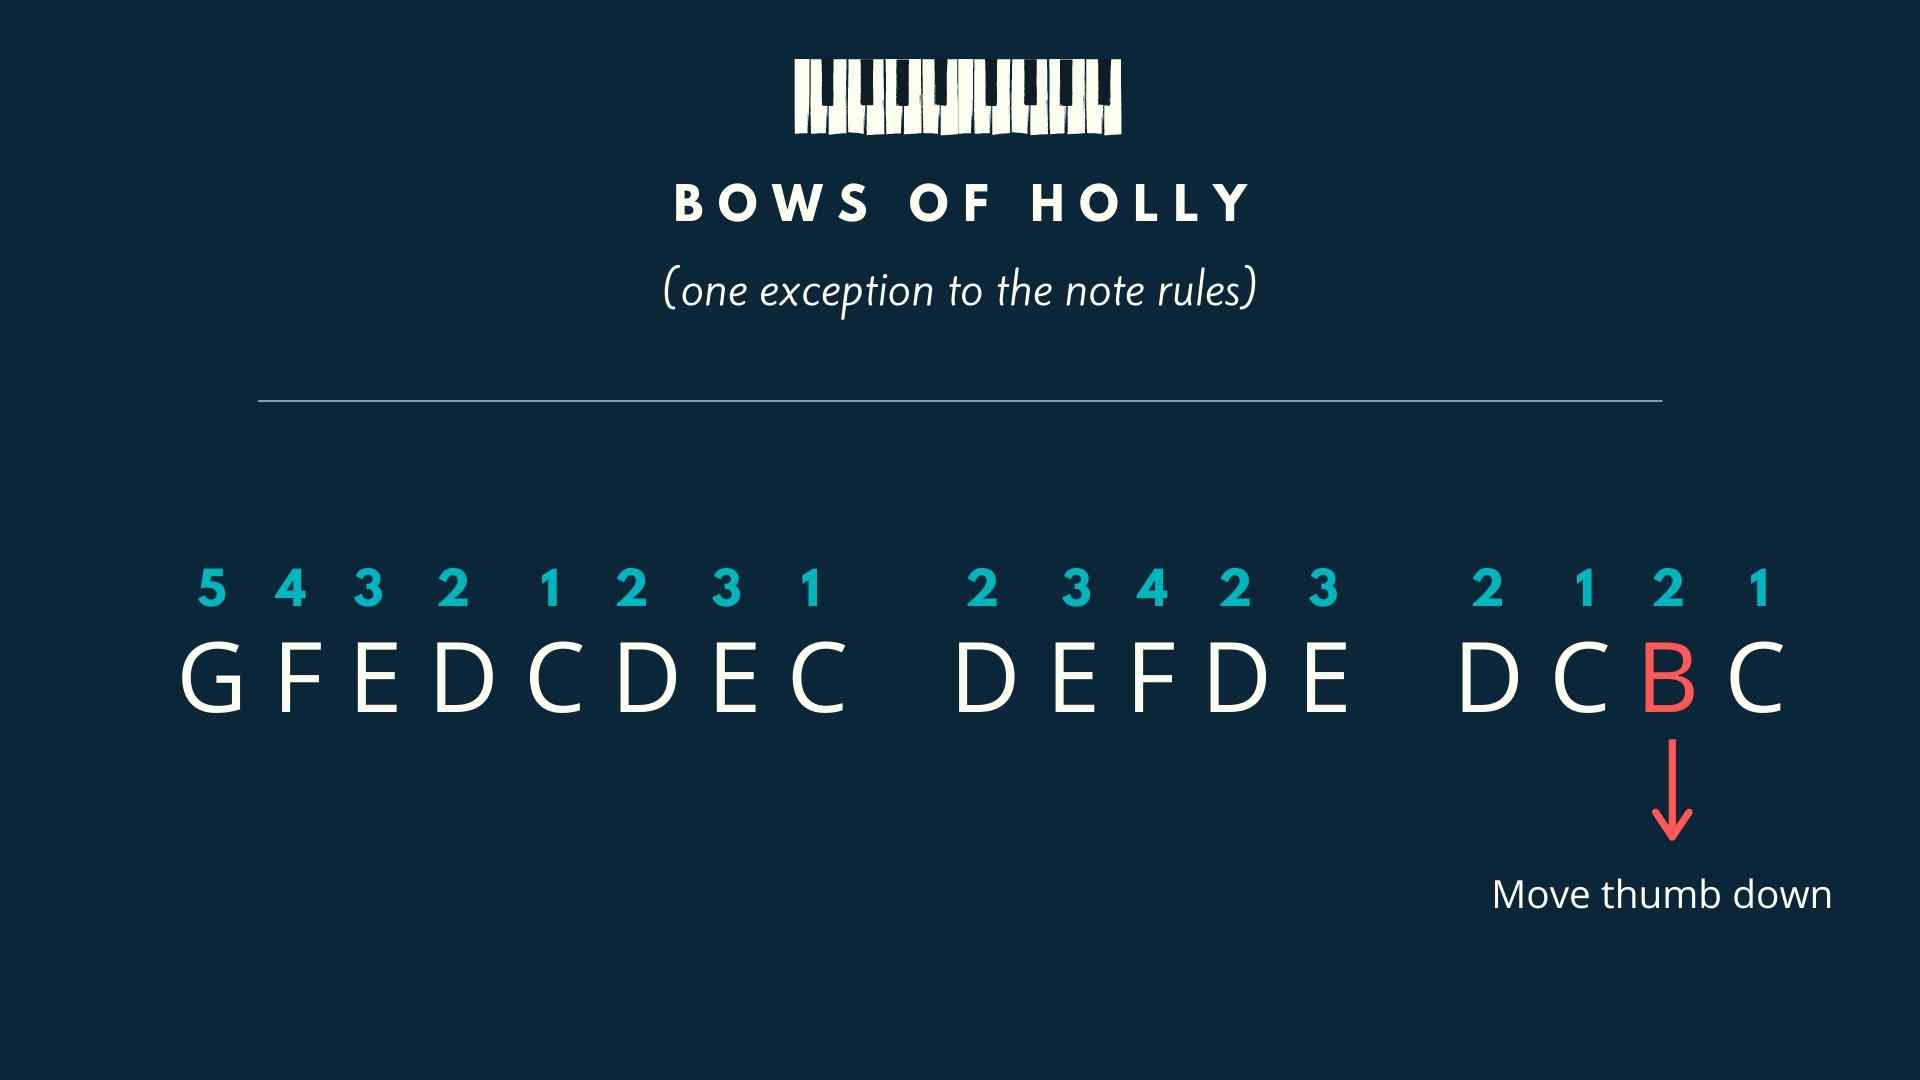
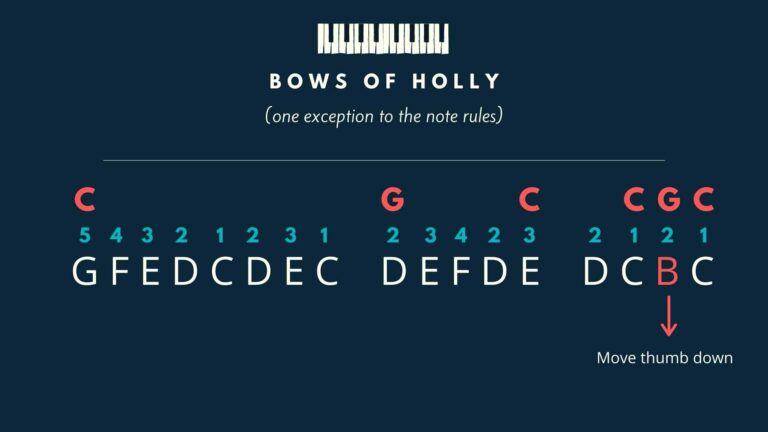
In this next one, I have highlighted a note that makes an exception of staying in the C position. Put your second finger (index finger) on this one and then go straight back to the thumb on the next C.
5 4 3 2 1 2 3 2 2 3 4 2 3 2 1 2 1
G F E D C D E D – D E F D E – D C B C
A super important part of playing music is the ability to hear the difference between pitches. And to hear if the melody goes up or down. When a melody goes up it gets a higher pitch. When it goes down, it gets a lower pitch. Going up is the same as saying to the right on the piano. Going down is to the left.
Think of other melodies that you might know and try to play these on the piano. Some of the melodies you think of might be more advanced without sounding particularly advanced. And they might have to use black keys. So here are some suggestions that only include white keys. Try to play these melodies. To make sure you only play on the white keys, it’s important you start on the notes I have suggested. I have also included a simple sound file of each piece for reference:
Jingle Bells (starting note: E)
Symphony (starting note: C)
God Save the Queen (starting note: C)
When the Saints Go Marching In (starting note: C)
William Tell Overture (starting note: C) NOTE: Includes a Bb note
Strauss – The Blue Danube (starting note: C) NOTE: Includes a F# note
It doesn’t matter what notes you’re playing and with what fingers. The important thing now is just to be able to find the melody on the piano. This can take time. The more you practise this, the better you will get. All the melodies I have suggested use only white keys.
If you find this hard, don’t worry. You can skip this for now. When you’ve had some more practise at the piano, come back to it, and it will be easier.
The next step after this is to learn how to play music that has been written down. Music in written form is after all the most common way of learning, composing, and sharing music. This is where sight-reading and sheet music comes in.
Reading sheet music
This video is made by Lisa Witt, and she does a great job explaining how to read sheet music:
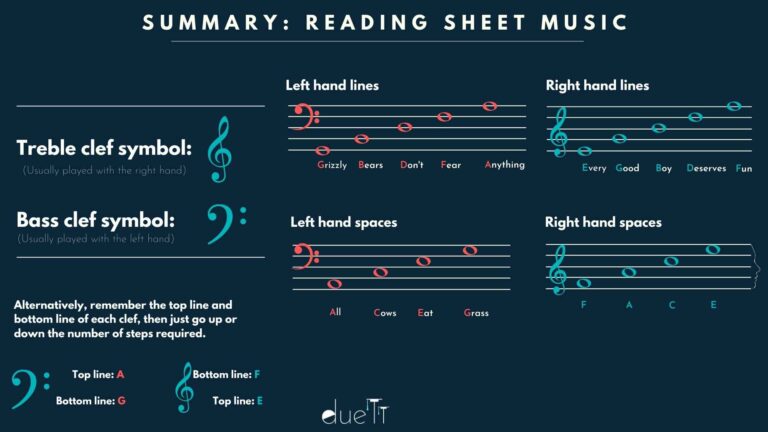
Note: When the finger numbers are in the treble clef, this usually refers to the right hand. And when they are in the bass clef, they are for the left hand.
Make sure I teach them about the most important note values and rhythm. Give them some books for how to practise this. I could also tell them about the four notes (top and bottom lines of both clefs) and maybe Every Good Boy Deserves Fun etc.
Summary:
Learn about sharps and flats
Now it’s time to learn how to use those black keys. Keep in mind that there is nothing intrinsically different between the black keys and the white keys. The piano could have been designed to have keys that all looked the same. It would just be extremely difficult to navigate. The black keys are just a way to give us a more visual keyboard where we can see the shapes of keys more easily.
Watch this video to understand what you need about sharps:
Be aware that when she talks about “natural” in this video, she means the white keys. The note C, can also be called “C natural”. The note D, can also be called “D natural”. This is the same with all the notes in the musical alphabet. To say that a note is natural is to say that it’s neither sharp or “flat”. In the next video you will learn what a “flat” is.
This is about “flats”, the sharps’ counterpart:
Now watch this. It goes a bit more in depth about sharps and flats, and you need to understand it.
Summary:
- Sharp means “go up a semitone”. Flat means “go down a semitone”.
- Sharp symbol: #
- Flat symbol: b
Half steps and whole steps
Half steps and whole steps are the most fundamental building blocks in music. You can use your understanding of this to make sense of how things are structured and also to navigate the piano. A lot of other things you will be doing from now on rely on your understanding of whole and half steps, so make sure you have fully understood this.
This concept is really easy, and can be learnt with a couple of short videos.
Half steps
Whole steps
Summary:
- Half steps go to the nearest note to the starting note. Also called semitones.
- Whole steps skip a note. They have a note between them. Also called whole tones.
Learn a few basic chords and some theory
A lot of people share the opinion that chords are some of the most amazing things with music. Knowing how to use them is satisfying and incredibly rewarding.
Chords are what music consists of. Any song you hear uses chords regardless of its genre. A chord is when you’re playing more than one note at the same time. We can also call this harmonisation, or harmony. You can play chords on a piano or a guitar, but not on a trumpet or a saxophone since it can only play one single note at a time.
Any melody you hear without any chords (when you just hear a single melody line) can be harmonised with chords.
Jazz music is the study of chords and harmony. When you go deep into jazz it can get incredibly complex. But most musicians and songwriters only understand the basics that you will learn in this guide. You also don’t need to go further than the basics. Because going beyond this means requires a dedication and obsession that most people are not interested in. Also, listening to jazz music that is too complex is not appreciated among the greater public.
Major chords
We usually group all chords into two main groups: Major chords and minor chords. Major chords can be described as happy sounding chords. Minor chords have a more melancholic quality to them.
Watch the next few videos in succession to learn what chords are and how to play them.
Chord basics
Major chords
The C major chord
The G major chord
The F major chord
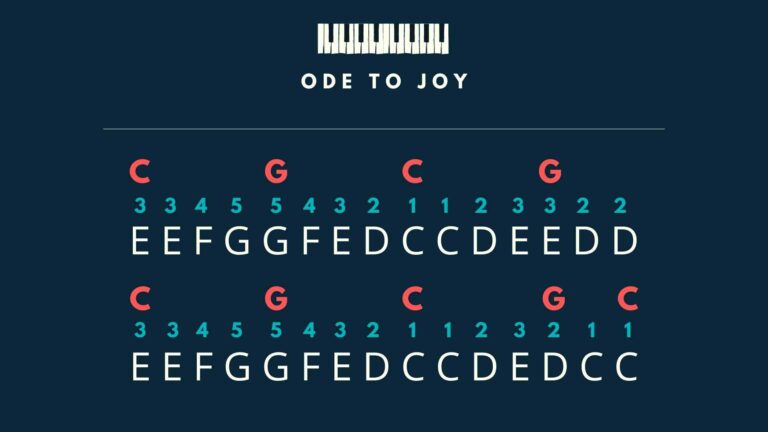
Before moving on, let’s put those chords to use. Remember those songs you played earlier with only your right hand? This time, we are going to use the exact same songs, but play the chords and then sing or hum the melody.
If you don’t want to sing or hum or find it difficult to find the correct notes with your voice, you can play the chords with your left hand, and then play the melody with your right hand.
Below, I have marked which chord to hold down in your left hand while playing the melody in your right hand at the same time as you’re playing the chords. The chords to play in your left hand are marked with the red letters.

In a future update I will upload a short video where I play through one of the songs to demonstrate what I mean.
Minor chords
There is only one single note that changes to make a major chord into a minor chord. It’s the note in the middle that goes down a semitone. Remember that a semitone is the same as a half step. This is how I would recommend you to find minor chords for now.
If you want to find the C minor chord, first play C major, then take the note in the middle down a semitone.
Here are some short videos that will teach you what you need to know about minor chords for now.
The E minor chord
The A minor chord
The D minor chord
Now that you know how to make a minor chord from a major chord, try to take all major chords you have learnt, C, G F and make them into minor.
If we add only one of those minor chords to our existing major chords, we can make the music sound a lot more interesting. Here are a couple of songs you can try. Play the melody in the right hand and the chords in the left hand.
Practising these kind of songs will be essential for you, and I will soon upload a lot more of them.
Reading the rhythm from sheet music is tricky. So when you’re reading this sheet music, don’t get hung up on reading the exact rhythm correctly. Instead, use the notes as a guide to find the correct notes and rely on your memory of the song as well. But please try your best to use the correct finger numbers I have written over the notes.
Key takeaways:
- It’s important to practise hands separately first, before practising hands together. This makes it much easier. And you shouldn’t do something difficult just because it’s difficult. You get good at playing the piano by improving in small incremental steps.
Summing up Stage 1
If you have made it this far in this guide, congratulations! You have now understand some really important concepts in music.
Before progressing to stage 2, let’s check something. Play a chord. Any chord will do. Hold the chord down, and look at your fingers. Are they curled? If any of them are collapsed or straight, fix this. When playing several notes at a time, it’s very common to forget about curling your fingers, because there is so much else to focus on.
Stage 2 is all about practising what you have learnt in stage 1. It’s important that you focus a lot on technique and curling your fingers while you go through the material in stage 2.